Getting Started
Create a Spring Boot Vaadin Project
BeanRunner uses the Vaadin framework for it’s UI layer, so you need to create a Vaadin project. Don’t worry, you don’t have to know anything about UI development when using BeanRunner, and creating such a project is easy:
Using Intellij IDEA
- File -> New -> Project…
- Select the “Spring” generator on the left side panel
- Enter your project details
- Click the “Next” button
- In the left side panel (Dependencies), expand “Web” and check “Vaadin”. Also select the “Lombok” generator from the “Developer Tools” section.
- Click “Create”
Using the Vaadin 24 starter project template
- Download the “Vaadin 24 - Spring Boot” starter project from https://vaadin.com/hello-world-starters
Add the BeanRunner Dependency
Add the GitHub packages repository in your project’s build.gradle file’s repositories section:
maven {
    name = "GitHubPackages"
    url = uri("https://maven.pkg.github.com/danbaryaakov/maven-packages/")
    credentials {
        username = project.findProperty("gpr.user") ?: System.getenv("GITHUB_USERNAME")
        password = project.findProperty("gpr.key") ?: System.getenv("GITHUB_TOKEN")
    }
}
(Make sure you have a GitHub personal access token with read:packages scope, and set the GITHUB_USERNAME and GITHUB_TOKEN environment variables)
Add the following dependency in the dependencies section:
implementation 'org.bean-runner:bean-runner-spring-boot-starter:<use latest version>'
Replace <use latest version> with the latest version of the BeanRunner starter shown Here
Configure Your Main Application Class
Add the @EnableVaadin({"org.beanrunner"}) annotation to your main application class
Add the @EnableScheduling annotation if you want to use CRON scheduling for your flows.
Add the "org.beanrunner" package to the scanBasePackages attribute of the @SpringBootApplication annotation as in the example below (Don’t forget to add the root packages of your own classes as well)
@SpringBootApplication(scanBasePackages = {"org.beanrunner", "com.my.package"})
@EnableScheduling
@EnableVaadin({"org.beanrunner"})
public class MySpringApplication {

    public static void main(String[] args) {
        SpringApplication.run(MySpringApplication.class, args);
    }

}
Configure persistent storage
BeanRunner requires a persistent storage to store runs, configurations and other data. Currently, a local filesystem is supported as well as GCS (Google storage bucket).
Let’s define a local storage for now. Add the following properties to your application.yml file:
bean-runner:
  storage:
    type: local
    local:
      path: bean-runner-files
This will store all bean runner data in a directory called bean-runner-files in the root of your project.
Adjust this as necessary if you want to use a different location. If you choose to leave it under your project directory, add it
to the .gitignore file to avoid committing it to your repository.
First Steps
The main building block of a flow is a Step. A flow is basically a collection of steps that are connected to each other. Each step is a spring bean extending the Step class.
The step that has no run dependencies is the first step in the flow.
Create some Steps
Let’s create some steps and see how they appear in the BeanRunner UI. Create the following classes somewhere in your project, then we’ll dive into the details of each class:
@Slf4j
@Component
public class HelloWorld extends Step<Void> {

    @Override
    public void run() {
        log.info("Hello, this is the first step");
    }

}
@Slf4j
@Component
public class Step1 extends Step<Step1.Data> {

    @Autowired
    @OnSuccess
    private HelloWorld helloWorld;

    public void run() {
        setData(new Data("Hello, this is some data from step 1"));
    }

    record Data(String message) {}

}
@Slf4j
@Component
public class Step2 extends Step<Void> {

    @Autowired
    @OnSuccess
    private Step1 step1;

    public void run() {
        log.info("Step 1 says " + step1.getData().message());
    }

}
@Slf4j
@Component
public class Step3 extends Step<Void> {

    @Autowired
    @OnSuccess
    private Step1 step1;

    public void run() {
        log.info("This runs in parallel to step 2");
    }

}
@Slf4j
@Component
public class Step4 extends Step<Void> {

    @Autowired
    @OnSuccess
    private Step2 step2;

    @Autowired
    @OnSuccess
    private Step3 step3;

    public void run() {
        log.info("This step will run after steps 2 and 3 are completed successfully");
    }

}
Run the Application
Run the application (preferably in debug mode so you can make some changes and see them reflected in the UI without restarting the application)
Then, open a browser and navigate to http://localhost:8080
On the left side of the screen you should see the new flow you created under the ‘Flows’ section.
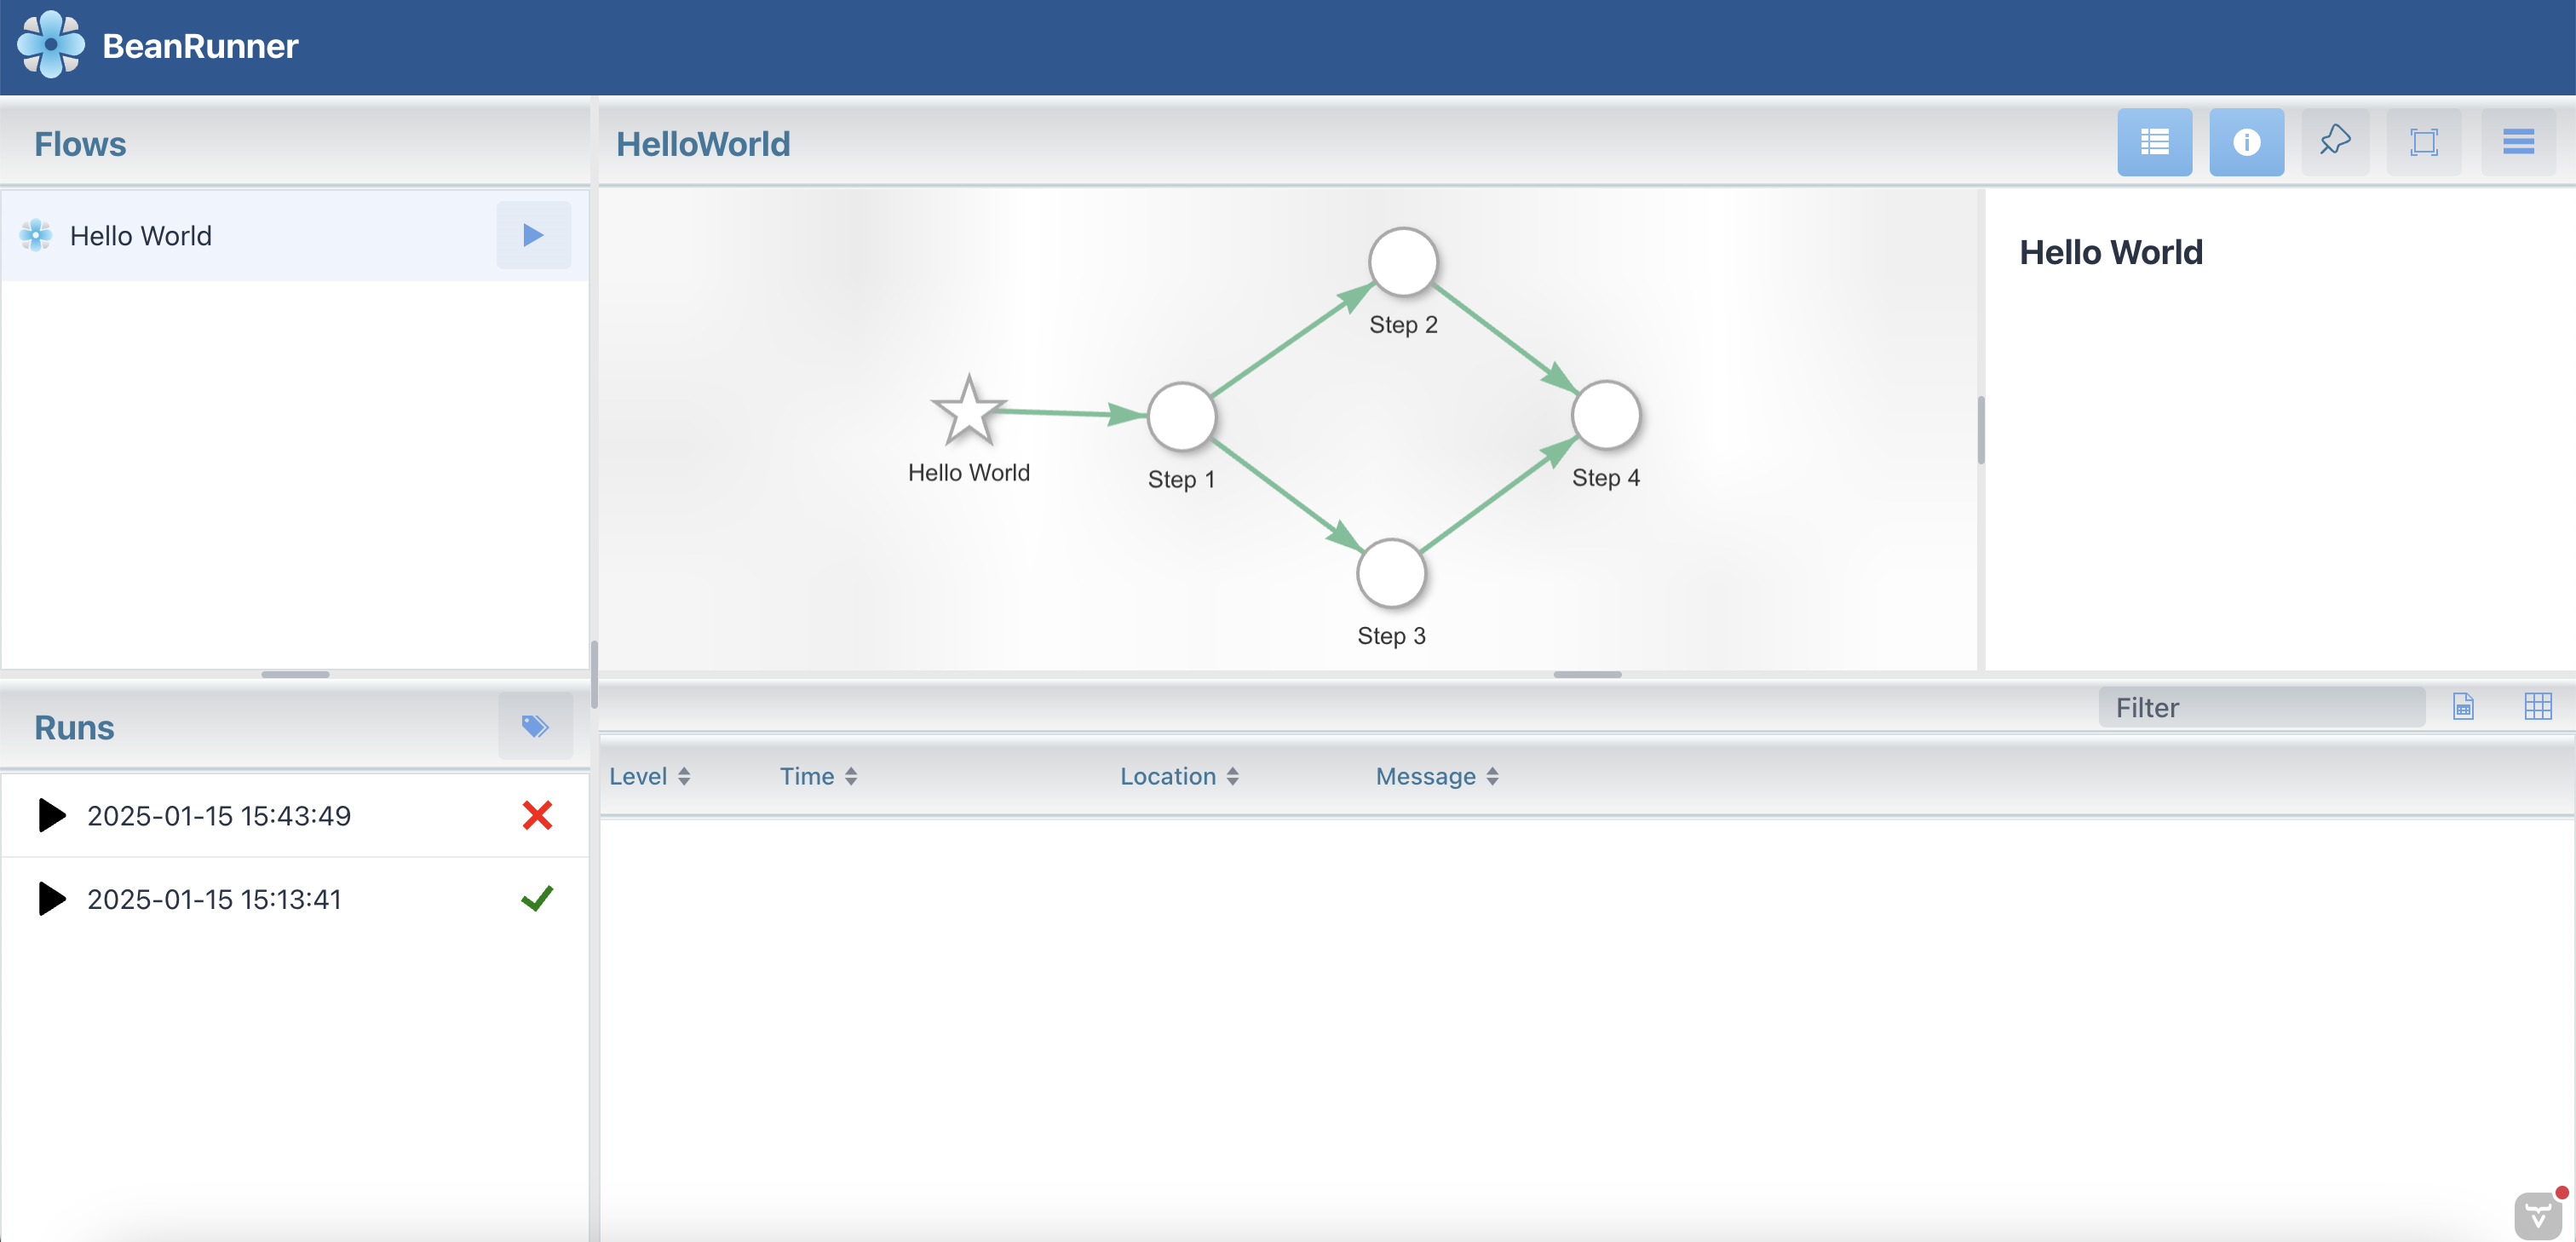
Organizing Steps in the UI
Notice that the first time steps appear in the UI, they can move freely on the screen so you can drag them around to organize as you like.
Click the ‘Pin’ button on the top right toolbar ![]() to stop them from moving around. This will also store the positions.
Note that every time you change the positions, click the ‘Pin’ button again to store the modified positions.
to stop them from moving around. This will also store the positions.
Note that every time you change the positions, click the ‘Pin’ button again to store the modified positions.
To focus the view on the entire flow, click the ‘Fit to View’ button ![]() on the top right toolbar.
on the top right toolbar.
As your flows become larger and more complex, it is important to organize the steps in a way that makes it easy to understand the flow logic and develop a visual memory of the flow.
You can also group steps together by adding the @StepGroup annotation to several steps that provide a common functionality, as will be explained further on.
Running the Flow
Click the Play button next to the flow name to run the flow. This will create a new flow “Run” (shown in the Runs section) and execute the flow. Select the step you want to focus on to see the logs and status of that step.
If you want to see the step transitions clearly, add some sleep in each of step’s run() method.
Making some changes
Let’s break a step. Change Step2’s run() method to the following:
public void run() {
    log.info("Step 1 says " + step1.getData().message());
    throw new RuntimeException("BOOM!");
}
Save the file. If you’re using Intellij IDEA with the Vaadin plugin, the class will reload without having to restart the application.
Run The flow again. You should see that the flow execution stops at Step2 and the status of the flow is FAILED indicated by a red X icon next to the Run name.
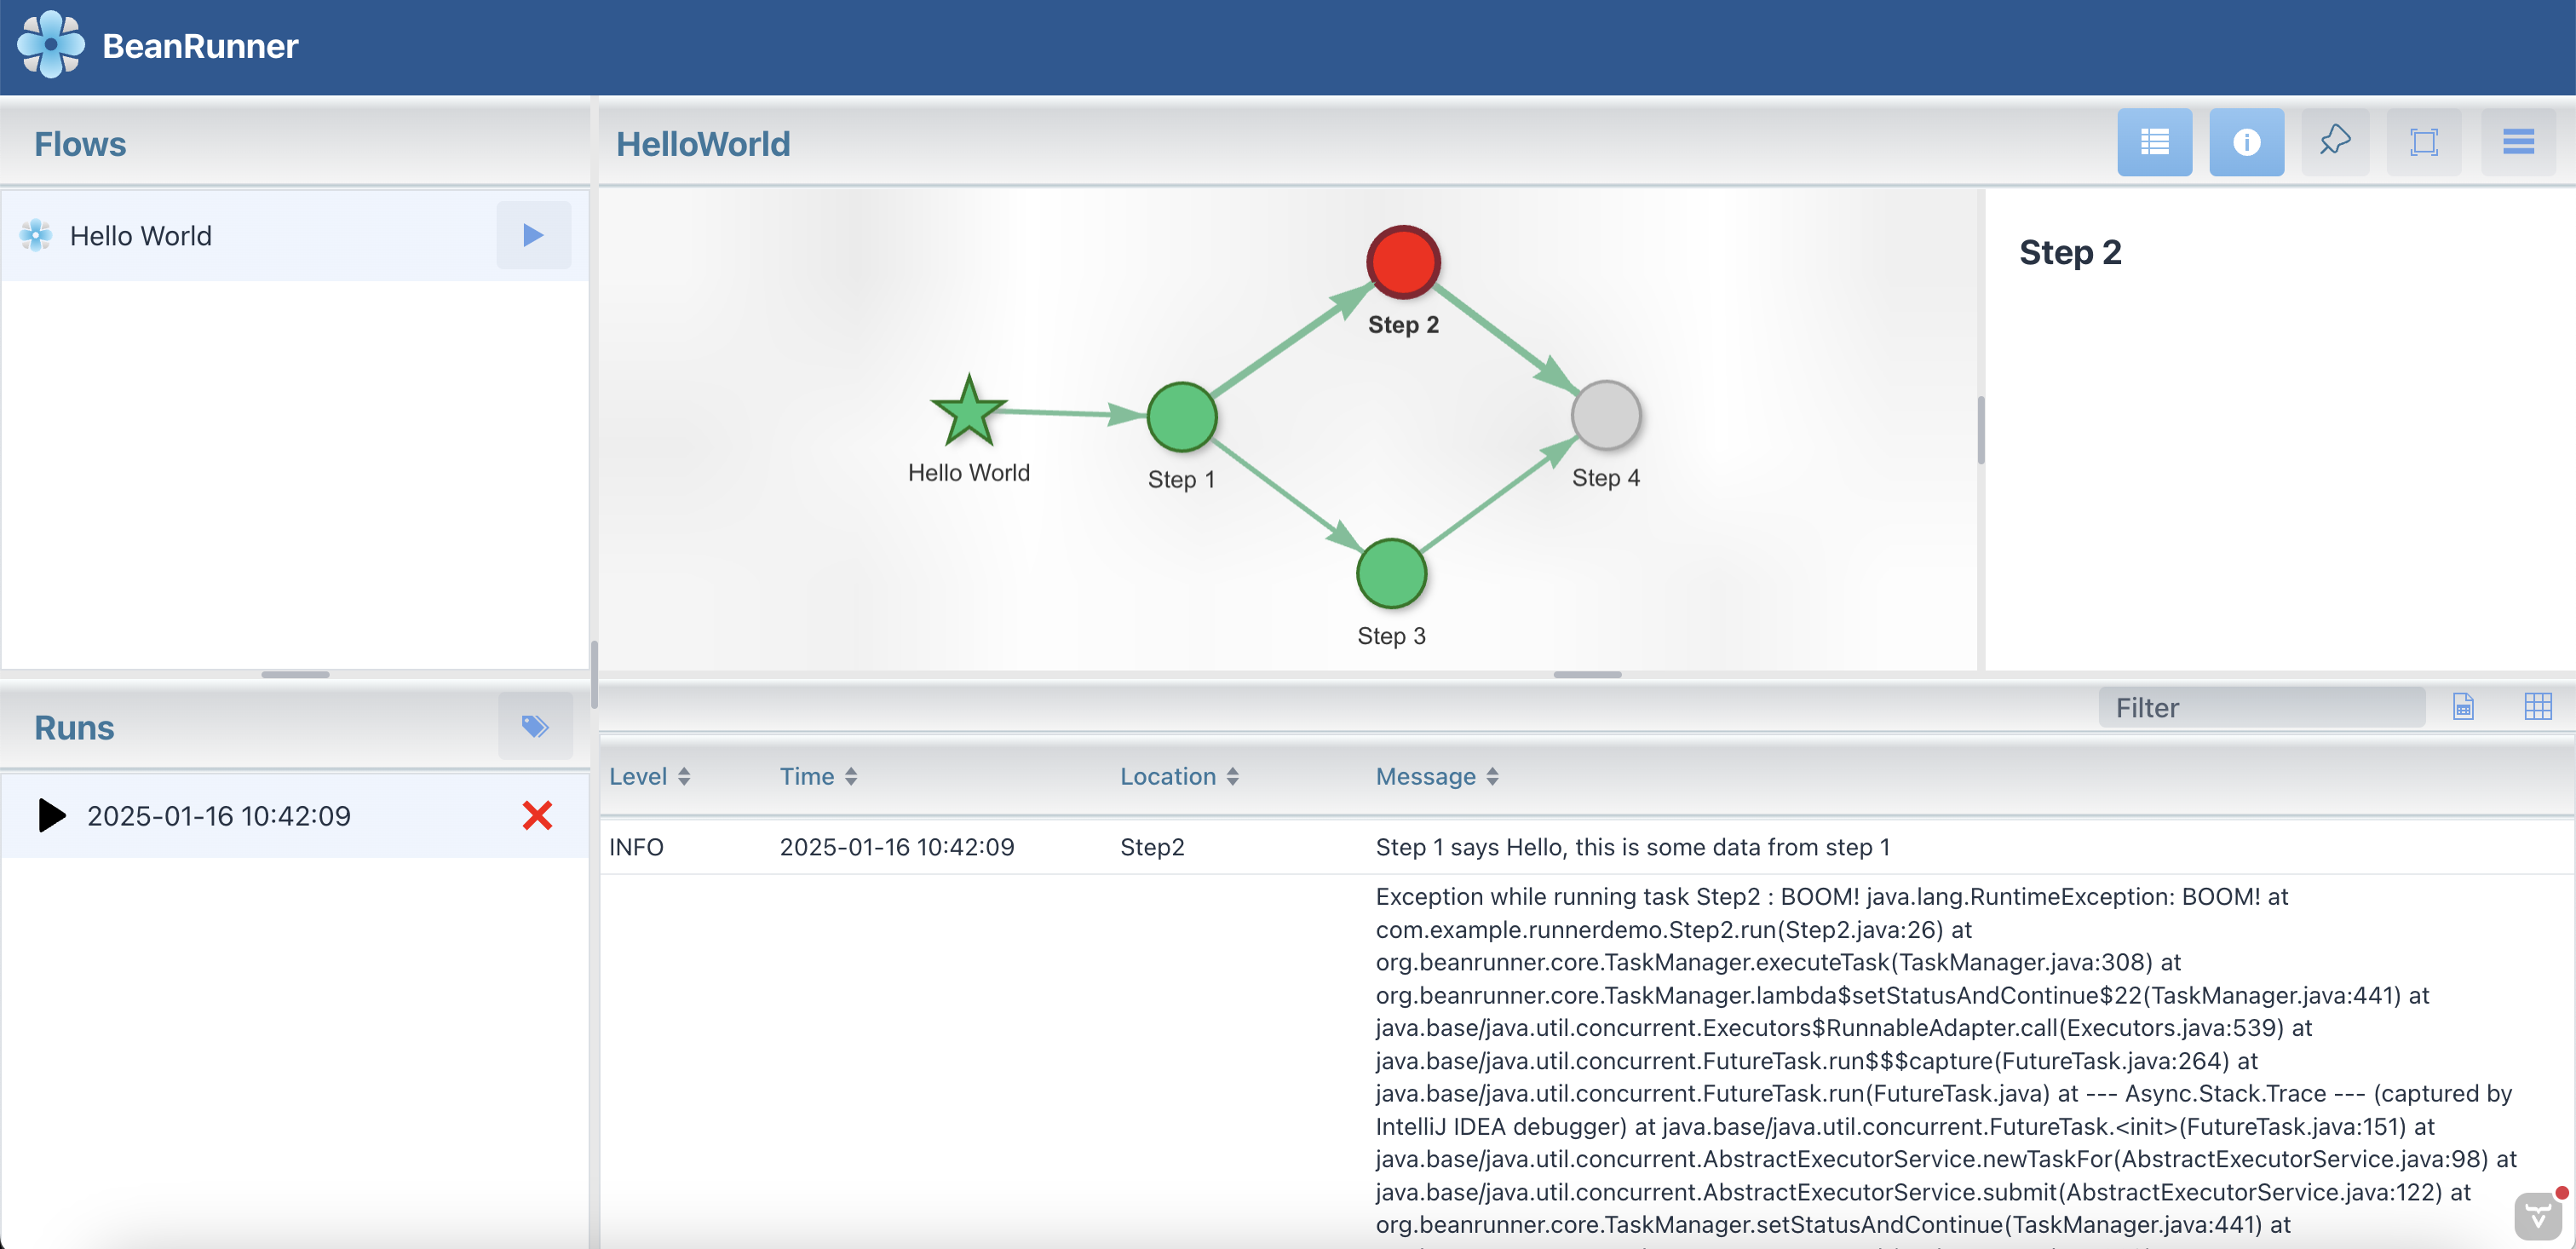
Select the failed step (Step 2) to view the error in the logs pane.
The Step Class
Let’s go through the details of the Step class and see all it can do.
Step Data
The Step class is the base class for all steps in the flow. It is a generic class that takes a type parameter representing the data that the step holds (or Void if the step doesn’t hold any data).
Every step that is “downstream” of the step (executes after it) can naturally autowire the step and call its getData() method to retrieve the stored data for the current run.
It is important to note that the run() method is called in the context of a current run. There can be multiple runs happening at the same time. When you
call setData() in the run method (or other methods to be explained next), the data is stored for the current run.
Therefore, do not store any run specific data anywhere else in the step class, as it will be shared between runs.
If the first step in your flow has data generic type defined, it is considered the input parameter for your flow and is passed from the caller and stored in the first step’s data automatically. We’ll see examples of flows with input parameters later.
Step run dependencies
Steps are run when all (or one of, depending on the trigger logic) run dependencies are satisfied. A run dependency is defined by annotating the field of the previous step with one of the following annotations:
@OnSuccess- The step runs when the previous step completes successfully.@OnComplete- The step runs when the previous step completes, regardless of success or failure.@OnUpstreamFailure- The step runs when the previous step fails or any step before it.@OnFailure- The step runs when the previous step fails and only it. (Not yet implemented)@OnDownstreamFailure- The step runs when any step after it in the flow fails. (Not yet implemented)
Step Trigger Logic
The step trigger logic type determines if it should run when all run dependencies are satisfied, or if
it should run when any of the run dependencies are satisfied. The default is ALL which means the step runs when all run dependencies are satisfied.
To change the trigger logic to OR, add the following annotation to the step:
@StepTriggerLogic(StepLogicOperator.OR)
We’ll see how the OR logic works a bit later when we get to branching.
Step Result
Each step can call the setResult(String result) method to store a result. This is mainly used for branching.
Dependent steps can then specify the result in the dependency annotation to run only when the result matches (for example @OnSuccess("branch_1"))
run() method
Every step has an optional run() method which executes when all the run dependencies of that step are satisfied.
probe() method
The probe() method (optional) is called after a successful call to run() periodically until it returns true. This is
for cases where you want to wait for some external condition to be satisfied before proceeding to the next step.
You can control the probe interval by calling setProbeInterval(long interval, TimeUnit unit) method in the run() method and also control the timeout by calling setProbeTimeout(Duration timeout) method.
rewind() method
The rewind() method (optional) is called when the flow is rewound on failure. This is useful for cleaning up resources that were allocated in the run() method.
The flow can also be rewound by adding the @StepRewindTrigger annotation to the last step in your flow (or a step that should start the cleanup process). We’ll see examples
of this a bit later. Rewind triggers can be automatic (by default) or manual (requiring the user to initiate the rewind in the UI).
Automatic rewinds are useful for flows that create some temporary resources, for example in the cloud, and need to clean them up at the end regardless of success or failure.
Manual rewinds are useful, for example, when you build a flow that deploys resources to a cloud environment, and you want to give the user the option to rollback the deployment when they wish.
Step Retries
By default, steps are executed with no retry. You can specify a retry configuration for a step using the following annotation on the step class:
@StepRetry(maxRetries = 3, delay = 5, delayUnit = TimeUnit.SECONDS)
With this annotation in place, the step will be retried 3 times with a delay of 5 seconds between each retry. The options above are the default when this annotation is added without any parameters.
Step Status
Each step has a status (relevant to a specific run) that is reflected in the diagram with a specific color when selecting the run. Here are the step statuses and their colors:
- Not started (white)
- Running (yellow)
- Success (bright green)
- Failure (bright red)
- Rewinding (orange)
- Rewind success (dark green)
- Rewind failure (dark red)
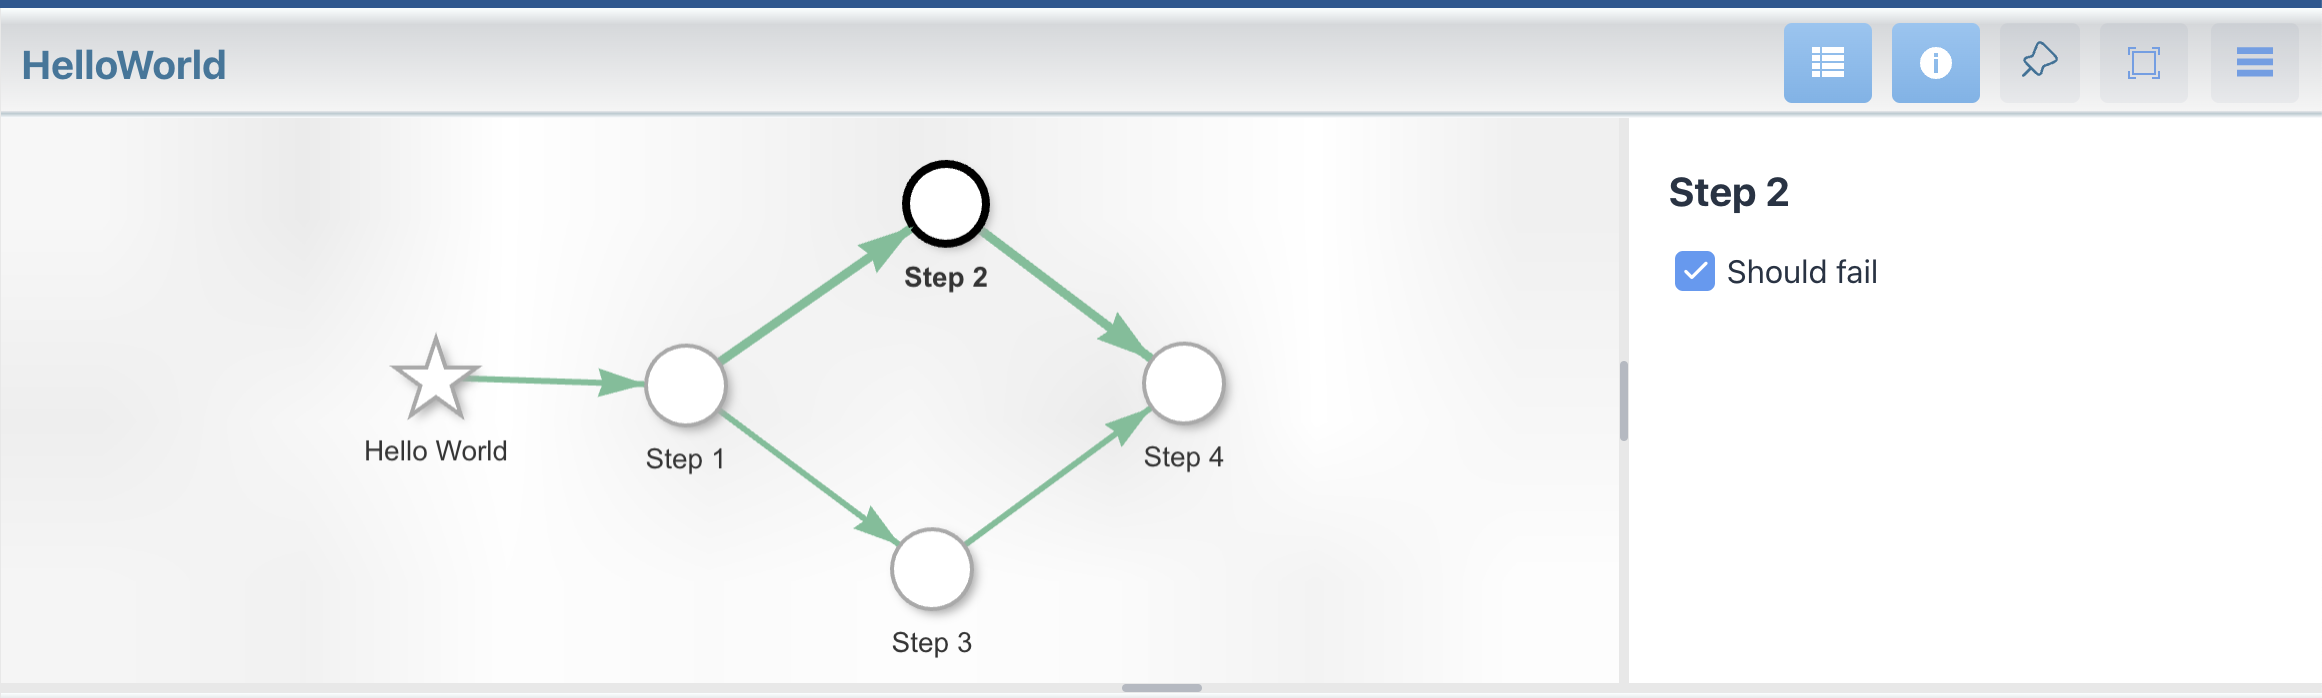
Step Configuration Properties
Steps can have configuration properties that can be set in the UI.
Let’s add a configuration property to Step2 that will determine if we fail the step or let it succeed:
@Slf4j
@Component
public class Step2 extends Step<Void> {

    @JsonProperty
    @UIConfigurable("Should fail")
    private boolean shouldFail = false;

    @Autowired
    @OnSuccess
    private Step1 step1;

    public void run() {
        log.info("Step 1 says " + step1.getData().message());
        if (shouldFail) {
            throw new RuntimeException("BOOM!");
        }
    }

}
Rerun the application (adding fields and methods aren’t supported by live reload), select the flow and Step 2 in the diagram and you should see a checkbox appear on the right side panel with the label “Should fail”. You can check or uncheck it to make the step fail or succeed.
Step configuration properties are stored persistently and once set they apply immediately to all runs of the flow. Therefore, it is best to not use configurations properties on rewind, but to keep the data of the resource that requires cleanup in the step data itself.
It is advisable to keep most of the configurations for a flow on the first step (or a major step) and then inject that step to the other steps that need the configuration, so that it’s easy to find and manage the configurations for the flow.
Default configurations from the application.yml file
You can set default values for configuration properties in the application.yml file. Let’s add a databaseUrl property to
the HelloWorld class to emulate a configurable property:
@Slf4j
@Getter
@Setter
@Component
@ConfigurationProperties("hello-world")
public class HelloWorld extends Step<Void> {

    @JsonProperty
    @UIConfigurable("Database URL")
    private String databaseUrl;

    // rest of implementation ...

}
Then in your application.yml file, add the following:
hello-world:
  database-url: "jdbc:postgresql://localhost:5432/hello-world"
Step Groups
You can group steps together in the UI by adding the @StepGroup annotation to the steps you want to group together.
The UI will then let you collapse or expand all step groups. Currently only one level of grouping is supported.
The @StepGroup annotation requires at a minimum a globally unique (in your current project) integer value as the group ID.
Let’s group two steps together::
public class MyStepGroups {
    public static final int MY_GROUP = 1;
}
@Slf4j
@Component
@StepGroup(value = MyStepGroups.MY_GROUP, name = "My Group")
public class Step2 extends Step<Void> {
    // rest of implementation ...
}
@Slf4j
@Component
@StepGroup(MyStepGroups.MY_GROUP)
public class Step3 extends Step<Void> {
    // rest of implementation ...
}
Step Name and Description
You can set a name and description for each step by adding the @StepName and @StepDescription annotations to the step class.
The description will appear in the right side panel when selecting the step.
Step Icons
You can set an icon for each step by adding the @StepIcon annotation to the step class. Add the icons (preferably in SVG format) to the META-INF/resources folder in your resources directory.
For example, if you’ve added the icon at META-INF/resources/icons/my-icon.svg, you can set it in the step class like this:
@StepIcon("icons/my-icon.svg")
Icons can also be added to a step group by specifying the icon path in the @StepGroup icon annotation parameter.
Defining Reusable Steps
The framework provides a way to define reusable steps as well as reusable step groups (a collection of interconnected steps that can be reused in any flow).
Here is an example of a reusable step, defined as an abstract class:
@Slf4j
public abstract class CreatePubSubTopicStep extends Step<PubSubTopicData> {

    @Override
    public void run() {
        String topicId = getTopicId();
        String projectId = getProjectId();
        // create the topic, then call the setData() method with the topic details
        // so that they are available to the next steps
    }

    @Override
    public void rewind() {
        // delete the topic according to what's stored in the data
    }

    protected abstract String getProjectId();
    protected abstract String getTopicId();

}
We can then create a concrete step that extends this abstract step and provides the project ID and topic ID either from a configuration property or from the data of a previous step. Of course, we can choose the granularity of the required attributes (for example have the abstract class require an object implementing an interface that contains the relevant attributes).
Scheduling a flow for execution
Once you’ve created a flow, you can easily configure it to be executed by a CRON schedule periodically using the @StepSchedule annotation on the first step in the flow:
@StepSchedule("0 * * * * *")
public class HelloWorld extends Step<Void> {
    // rest of implementation
}
This will schedule the flow to run every minute. Use spring format CRON expressions. You can then enable or disable the scheduled execution in the UI using the clock icon that will appear next to the flow name.
Flow Pause & Resume
Pause & Resume can be enabled for flows using the following annotation:
@FlowPauseBehavior(failureBehavior = FailureBehavior.PAUSE)
This will make the flow pause on failure, and you can then resume it manually from the UI. You can also pause the flow manually from the UI at any time and resume at a later time. It is recommended that all long running flows have this feature enabled.